How to set-up WatchGuard VPN with IKEv2 under Debian and Fedora
As far as I know, I'm the only Linux user at the company where I work and for the longest time I used OpenVPN to connect to our WatchGuard VPN service. OpenVPN was quick and easy to configure and worked out-of-the-box on my Debian and Fedora systems. However, WatchGuard deprecated OpenVPN in favour of IKEv2.
WatchGuard provide helpful instructions for using their VPN service with Windows, macOS, iOS and Android, but do not provide any instructions for Linux users. I found searching the web for instructions to be a bit sketchy, so I figured I'd write some instructions that I found work for me.
Debian
At the time of writing, I am using Debian 12 (bookworm). The following instructions assume you are using the default GNOME desktop environment. Support for other desktops is beyond the scope of this post.
Install packages
Enter the following terminal command to install the additional required packages:
sudo apt install network-manager-strongswan libcharon-extra-plugins
Install WatchGuard root CA certificate
You will need to install the WatchGuard certificate file. WatchGuard provide details on how to obtain the certificate here. If you don't have admin access to your VPN service, ask your VPN administrator to provide it.
Under Debian, CA certificates are located in /usr/local/share/ca-certificates/. I create a new directory under that directory to store the WatchGuard certificate, before running the terminal command to update the system's store of CA certificates.
sudo mkdir /usr/local/share/ca-certificates/watchguard
sudo cp rootca.crt /usr/local/share/ca-certificates/watchguard/
sudo update-ca-certificates
If successful, the update-ca-certificates command should produce output similar to below:
Updating certificates in /etc/ssl/certs...
rehash: warning: skipping ca-certificates.crt,it does not contain exactly one certificate or CRL
1 added, 0 removed; done.
Running hooks in /etc/ca-certificates/update.d...
done.
Set-up VPN connection
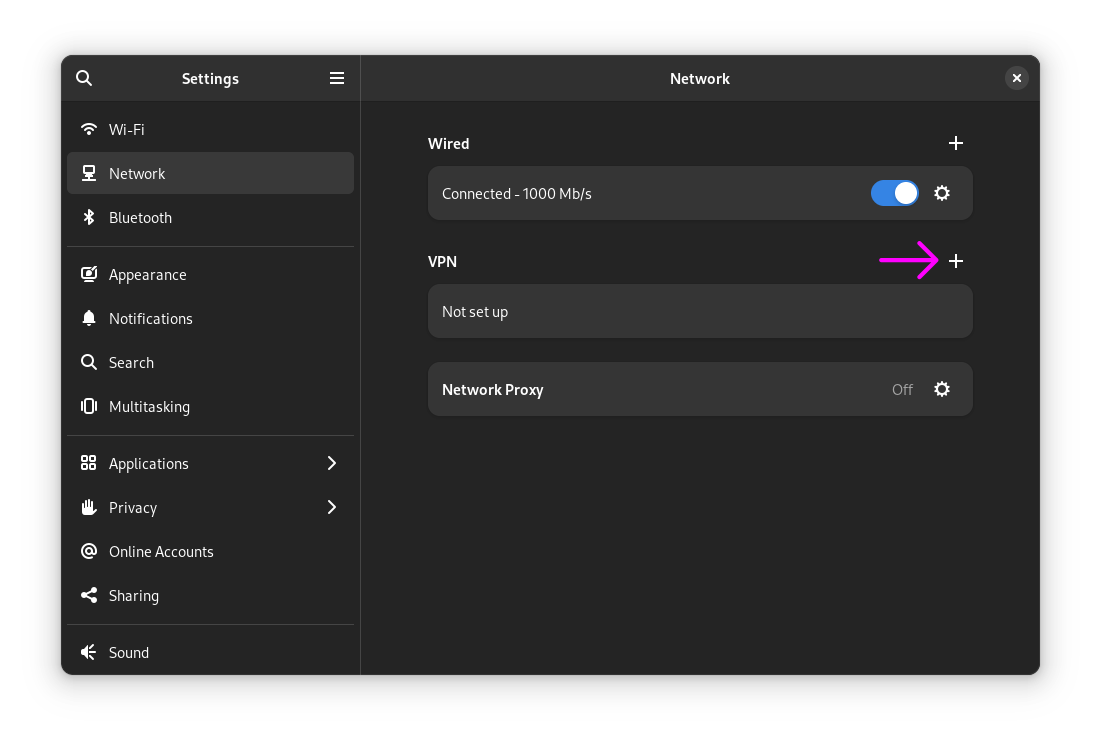
Next, using GNOME settings app, create a new VPN connection. Open the GNOME settings app, navigate to the 'Network' tab and click the plus icon next to the VPN heading.
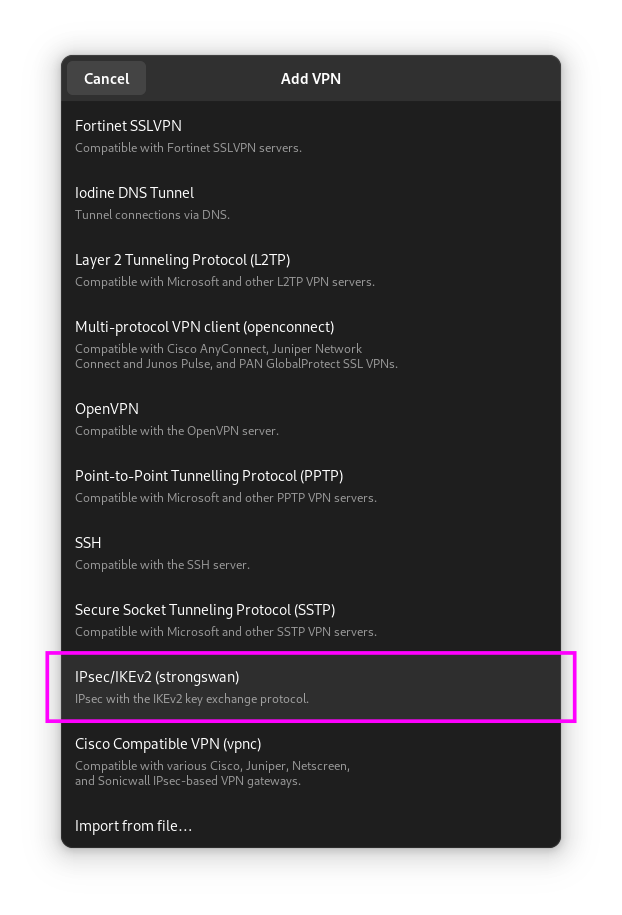
Select the 'IPsec/IKEv2 (strongswan)' option when presented.
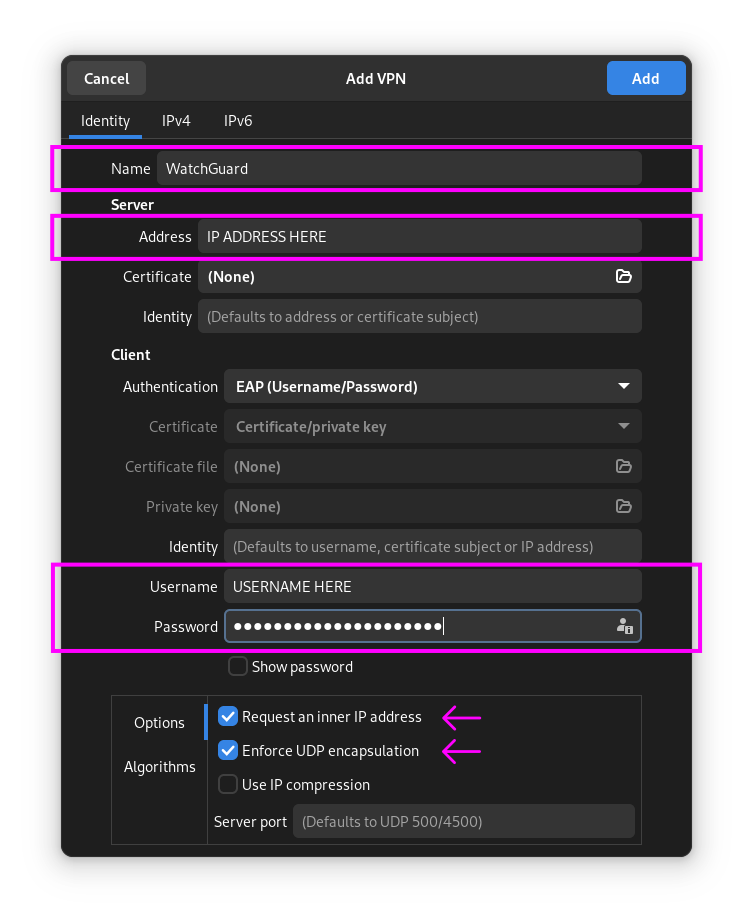
On the VPN Identity settings screen, enter the following details:
- Provide a name for VPN connection. You can name it whatever you like, I named my connection "WatchGuard".
- Enter the IP address of your WatchGuard VPN service. If you don't know it, ask your VPN administrator.
- Enter your username and password.
- Check both "Request an inner IP address" and "Enforce UDP encapsulation"
Your VPN connection should now be working.
Fedora
At the time of writing, I am using Fedora 40 and 41. The following instructions assume you are using the default GNOME desktop environment. Support for other desktops is beyond the scope of this post.
Install packages
Enter the following terminal command to install the additional required packages:
sudo dnf install NetworkManager-strongswan NetworkManager-strongswan-gnome strongswan-charon-nm
Install WatchGuard root CA certificate
You will need to install the WatchGuard certificate file. WatchGuard provide details on how to obtain the certificate here. If you don't have admin access to your VPN service, ask your VPN administrator to provide it.
Under Fedora, the WatchGuard CA certificate needs to be placed in /etc/strongswan/ipsec.d/cacerts/. This can be achieved with the following terminal command:
sudo cp -p rootca.pem /etc/strongswan/ipsec.d/cacerts/
Fedora 41 note: Depending on how your WatchGuard certificate is configured, this may or may not be required, but I had to adjust the crypto policies under Fedora 41 to allow for SHA1. This can be done by editing the file /etc/crypto-policies/config to read.
DEFAULT:SHA1
Before running the terminal command:
sudo update-crypto-policies
Set-up VPN connection
Next, using GNOME settings app, create a new VPN connection. The instructions for this are exactly the same as for Debian, see above.
Debugging connection issues
If for any reason the connection fails to connect, it can be helpful to read your system's logs to try and debug any errors. Network Manager logs can be read using the following terminal command:
sudo journalctl -u NetworkManager.service